You might have seen slash command bots on random discord servers. These commands start with a slash / and perform a specific action.
This article will create one of these bots that will listen to the /randomice command and return a random mouse. (See what I did there 😂).
The bot will look like this once we finish.
Register the discord bot
The first thing we need to do is register a new discord bot. For this, we need to visit the discord developer portal.
Once you are there, we can register a new application by clicking the button in the top right corner.
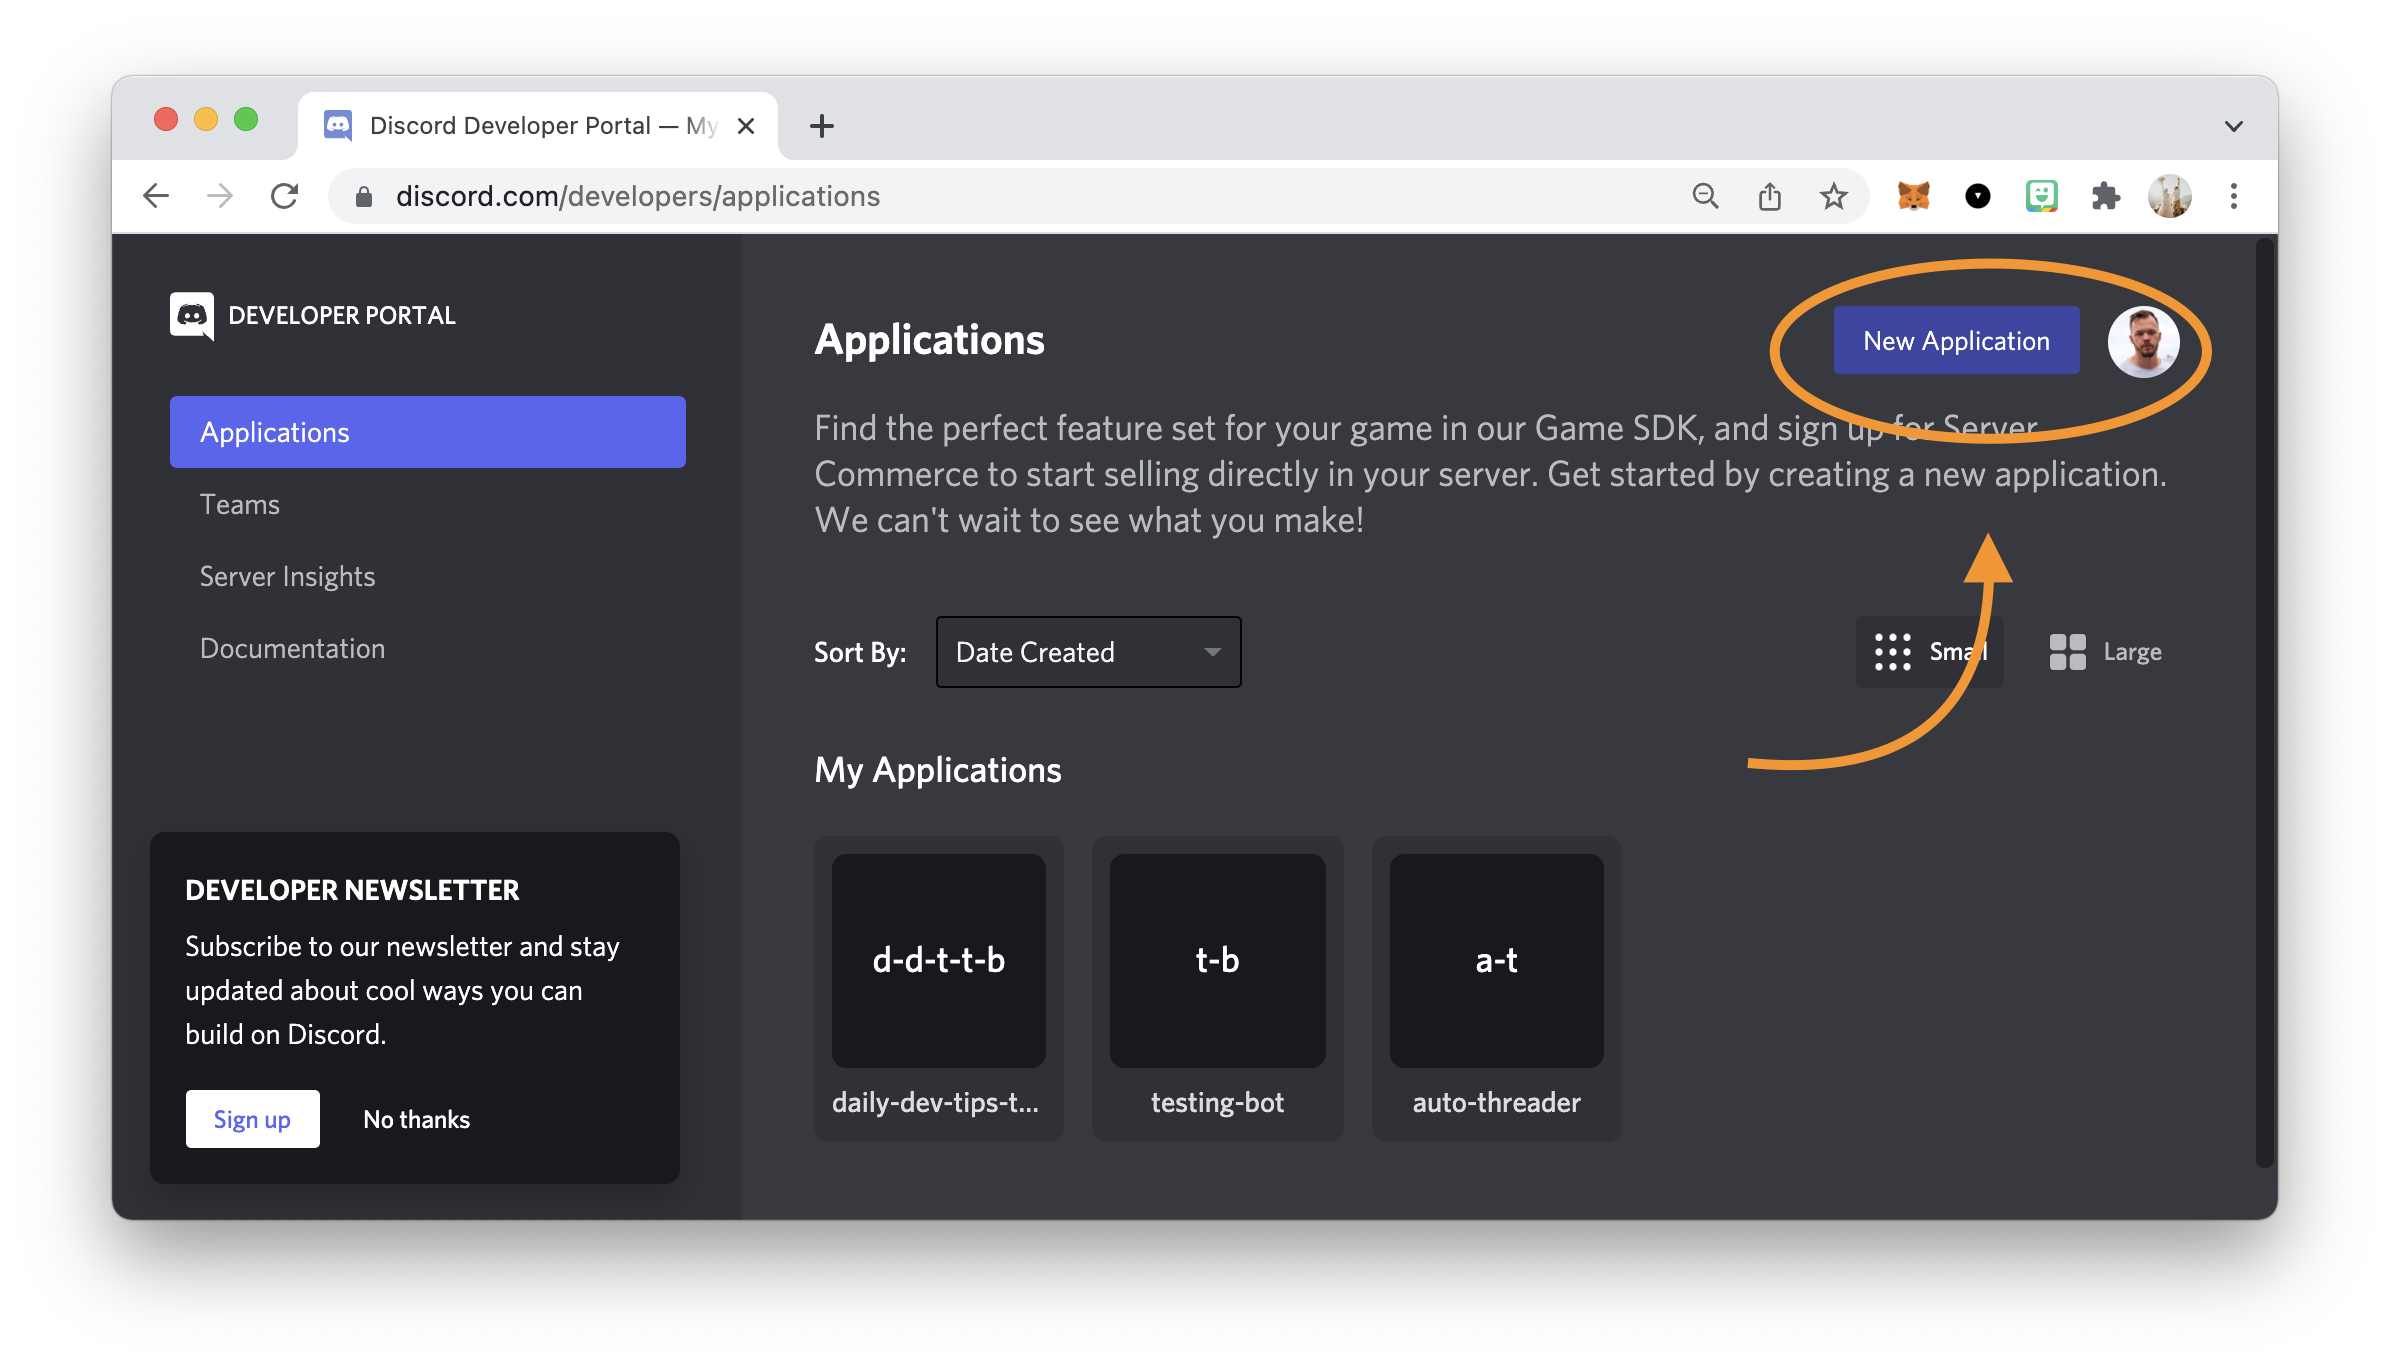
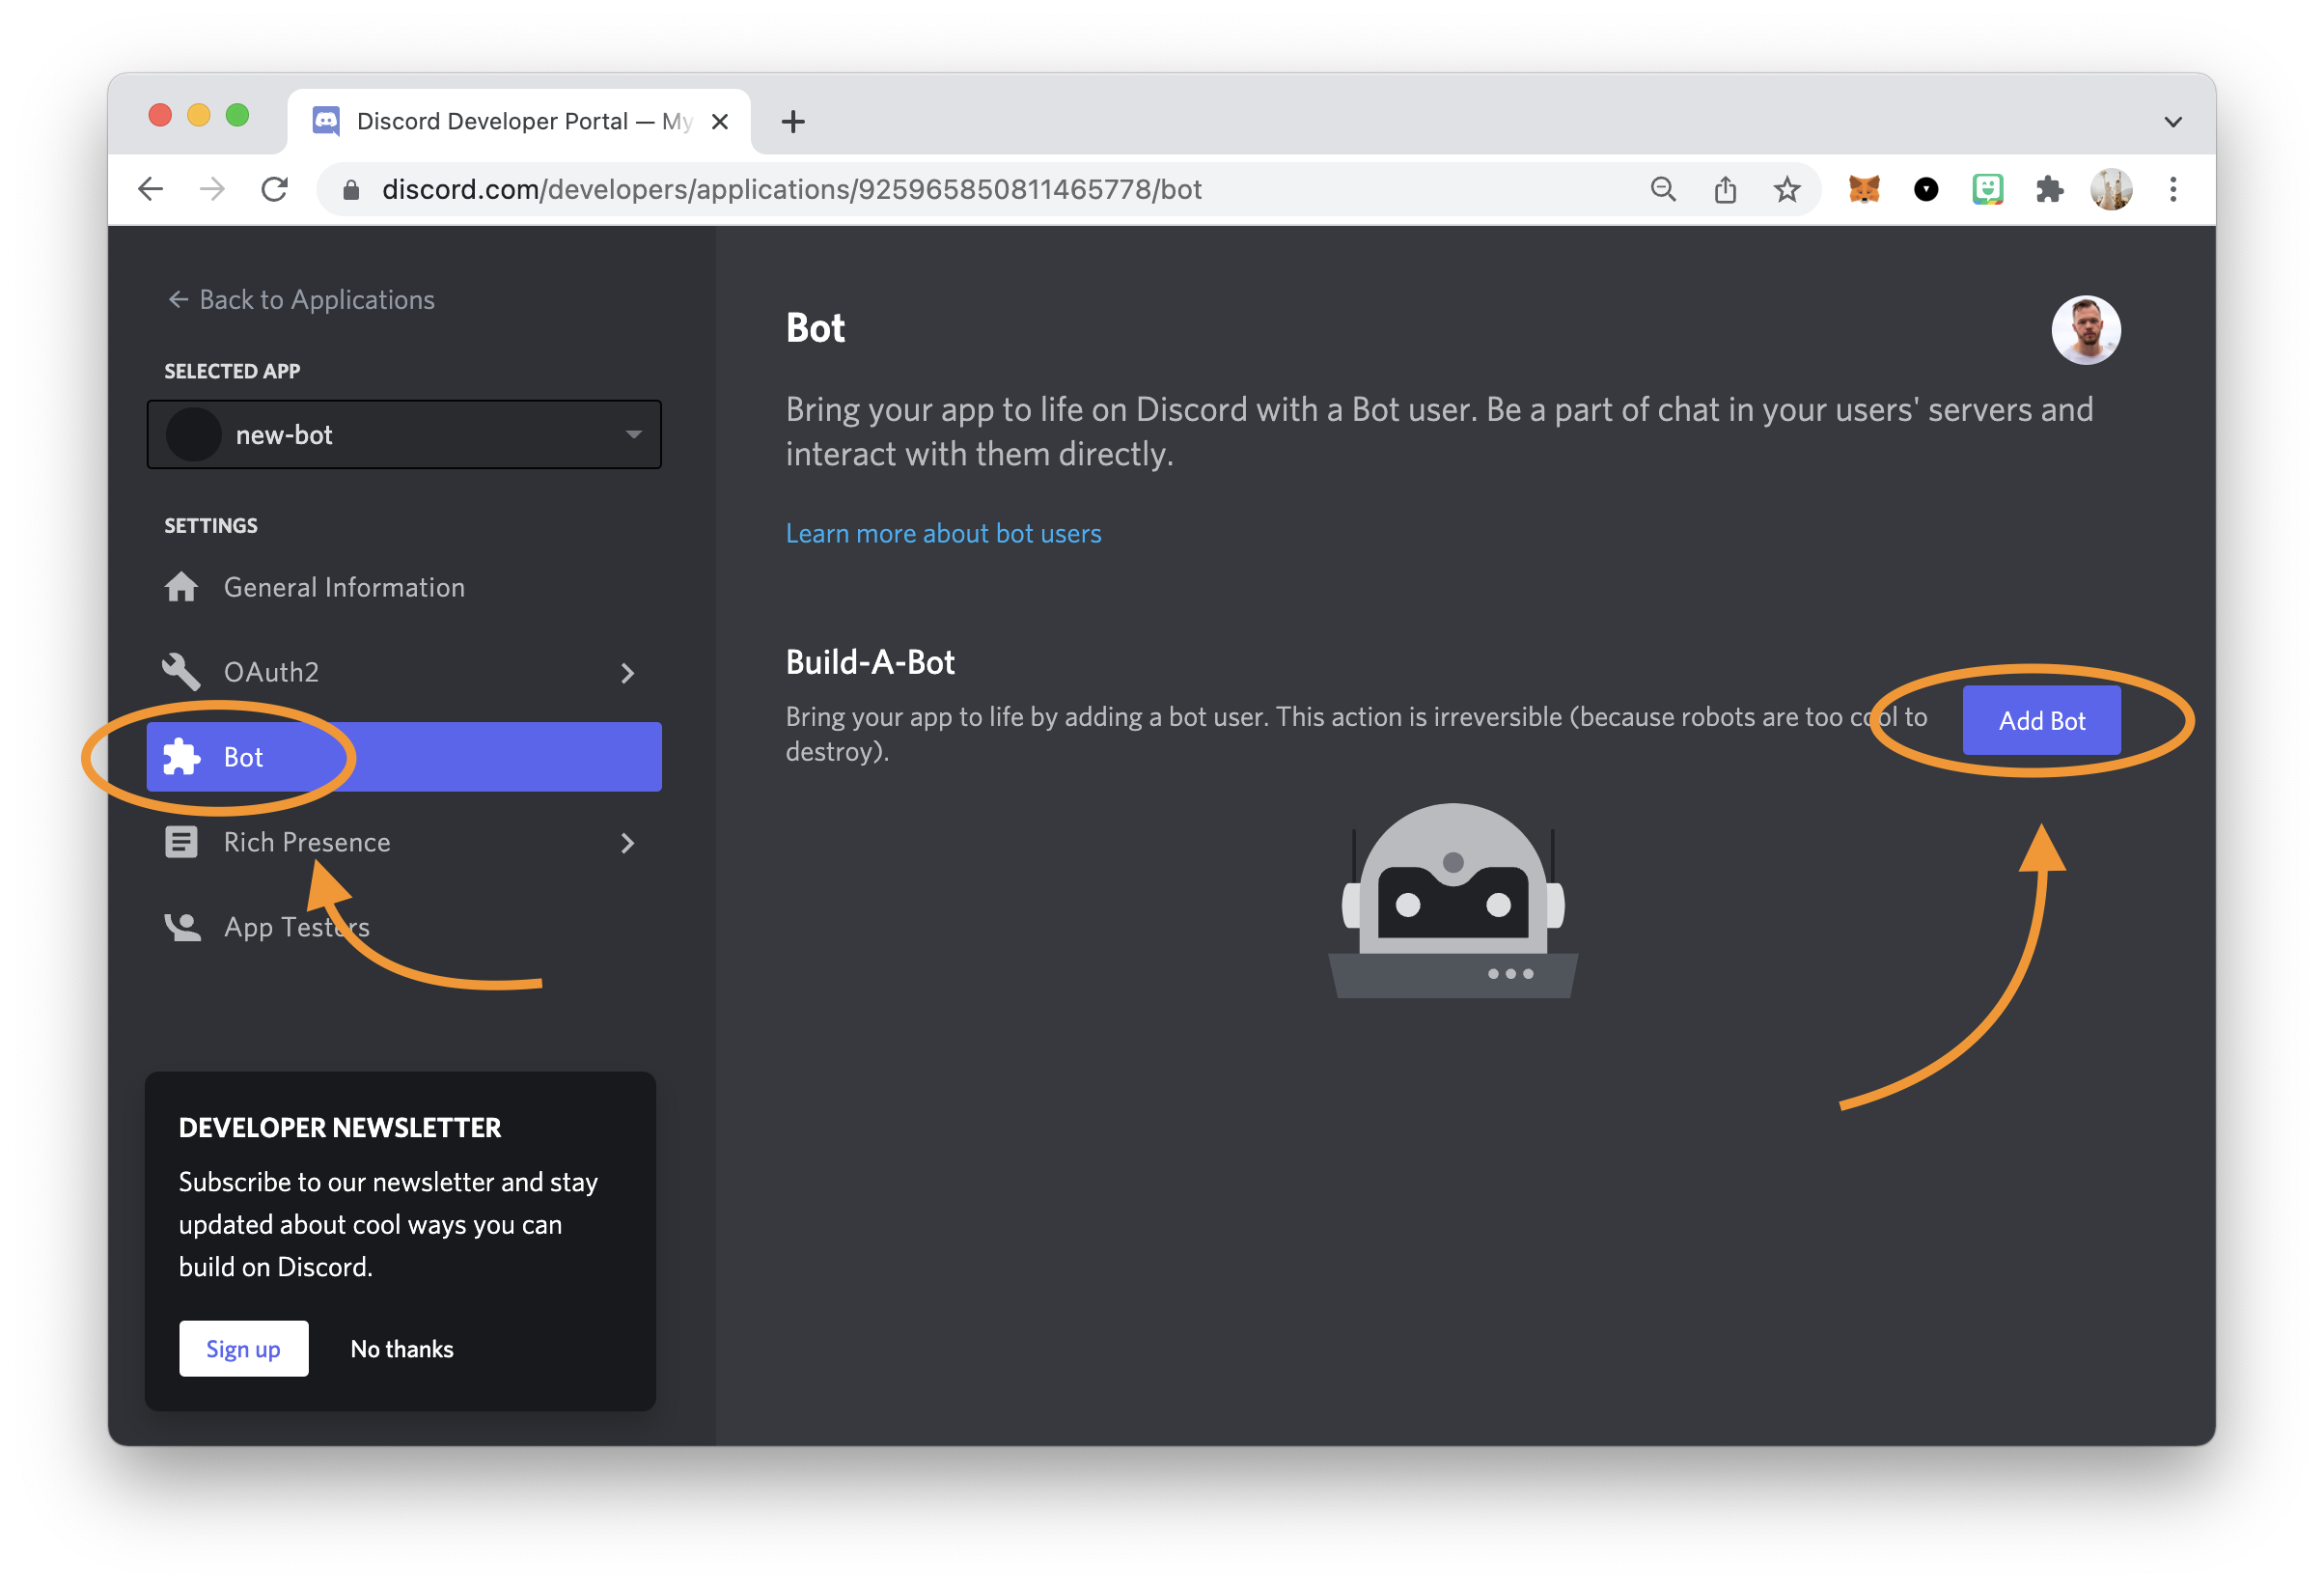
Once this step is done, you should automatically enter the new application and see the bot section on the left. Press this and add a new bot.
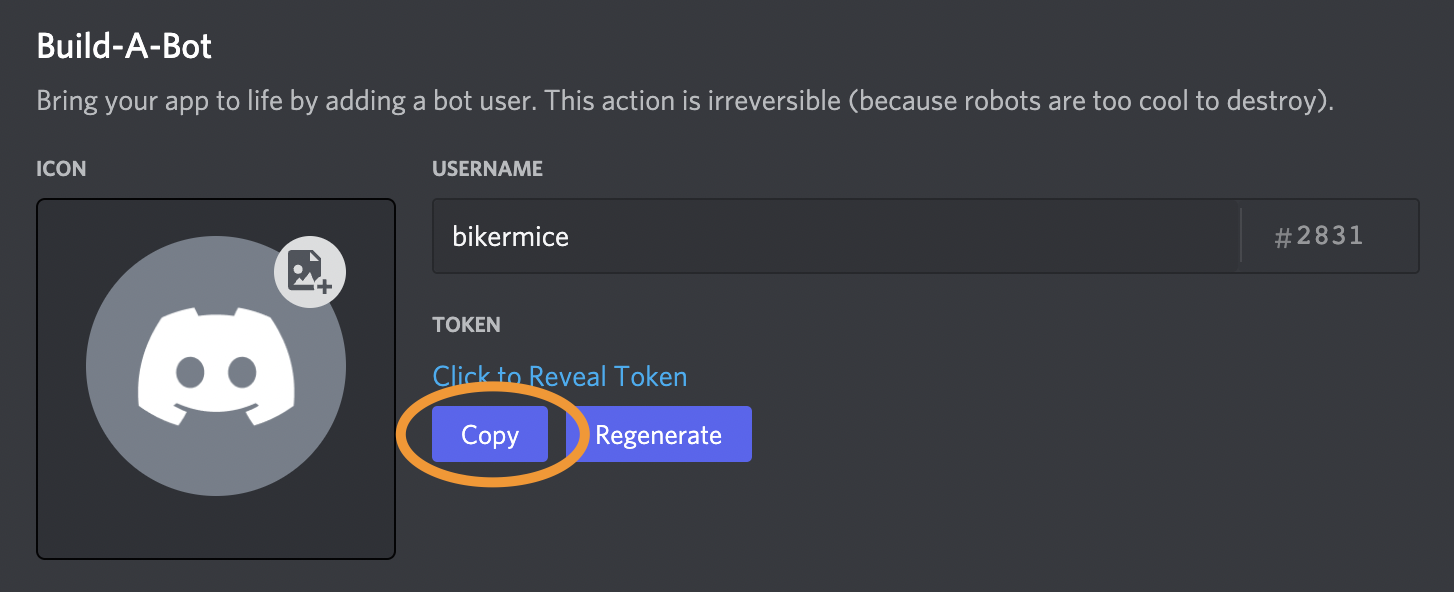
On the following screen, copy the token of this bot into a save place. We'll need this in a second.
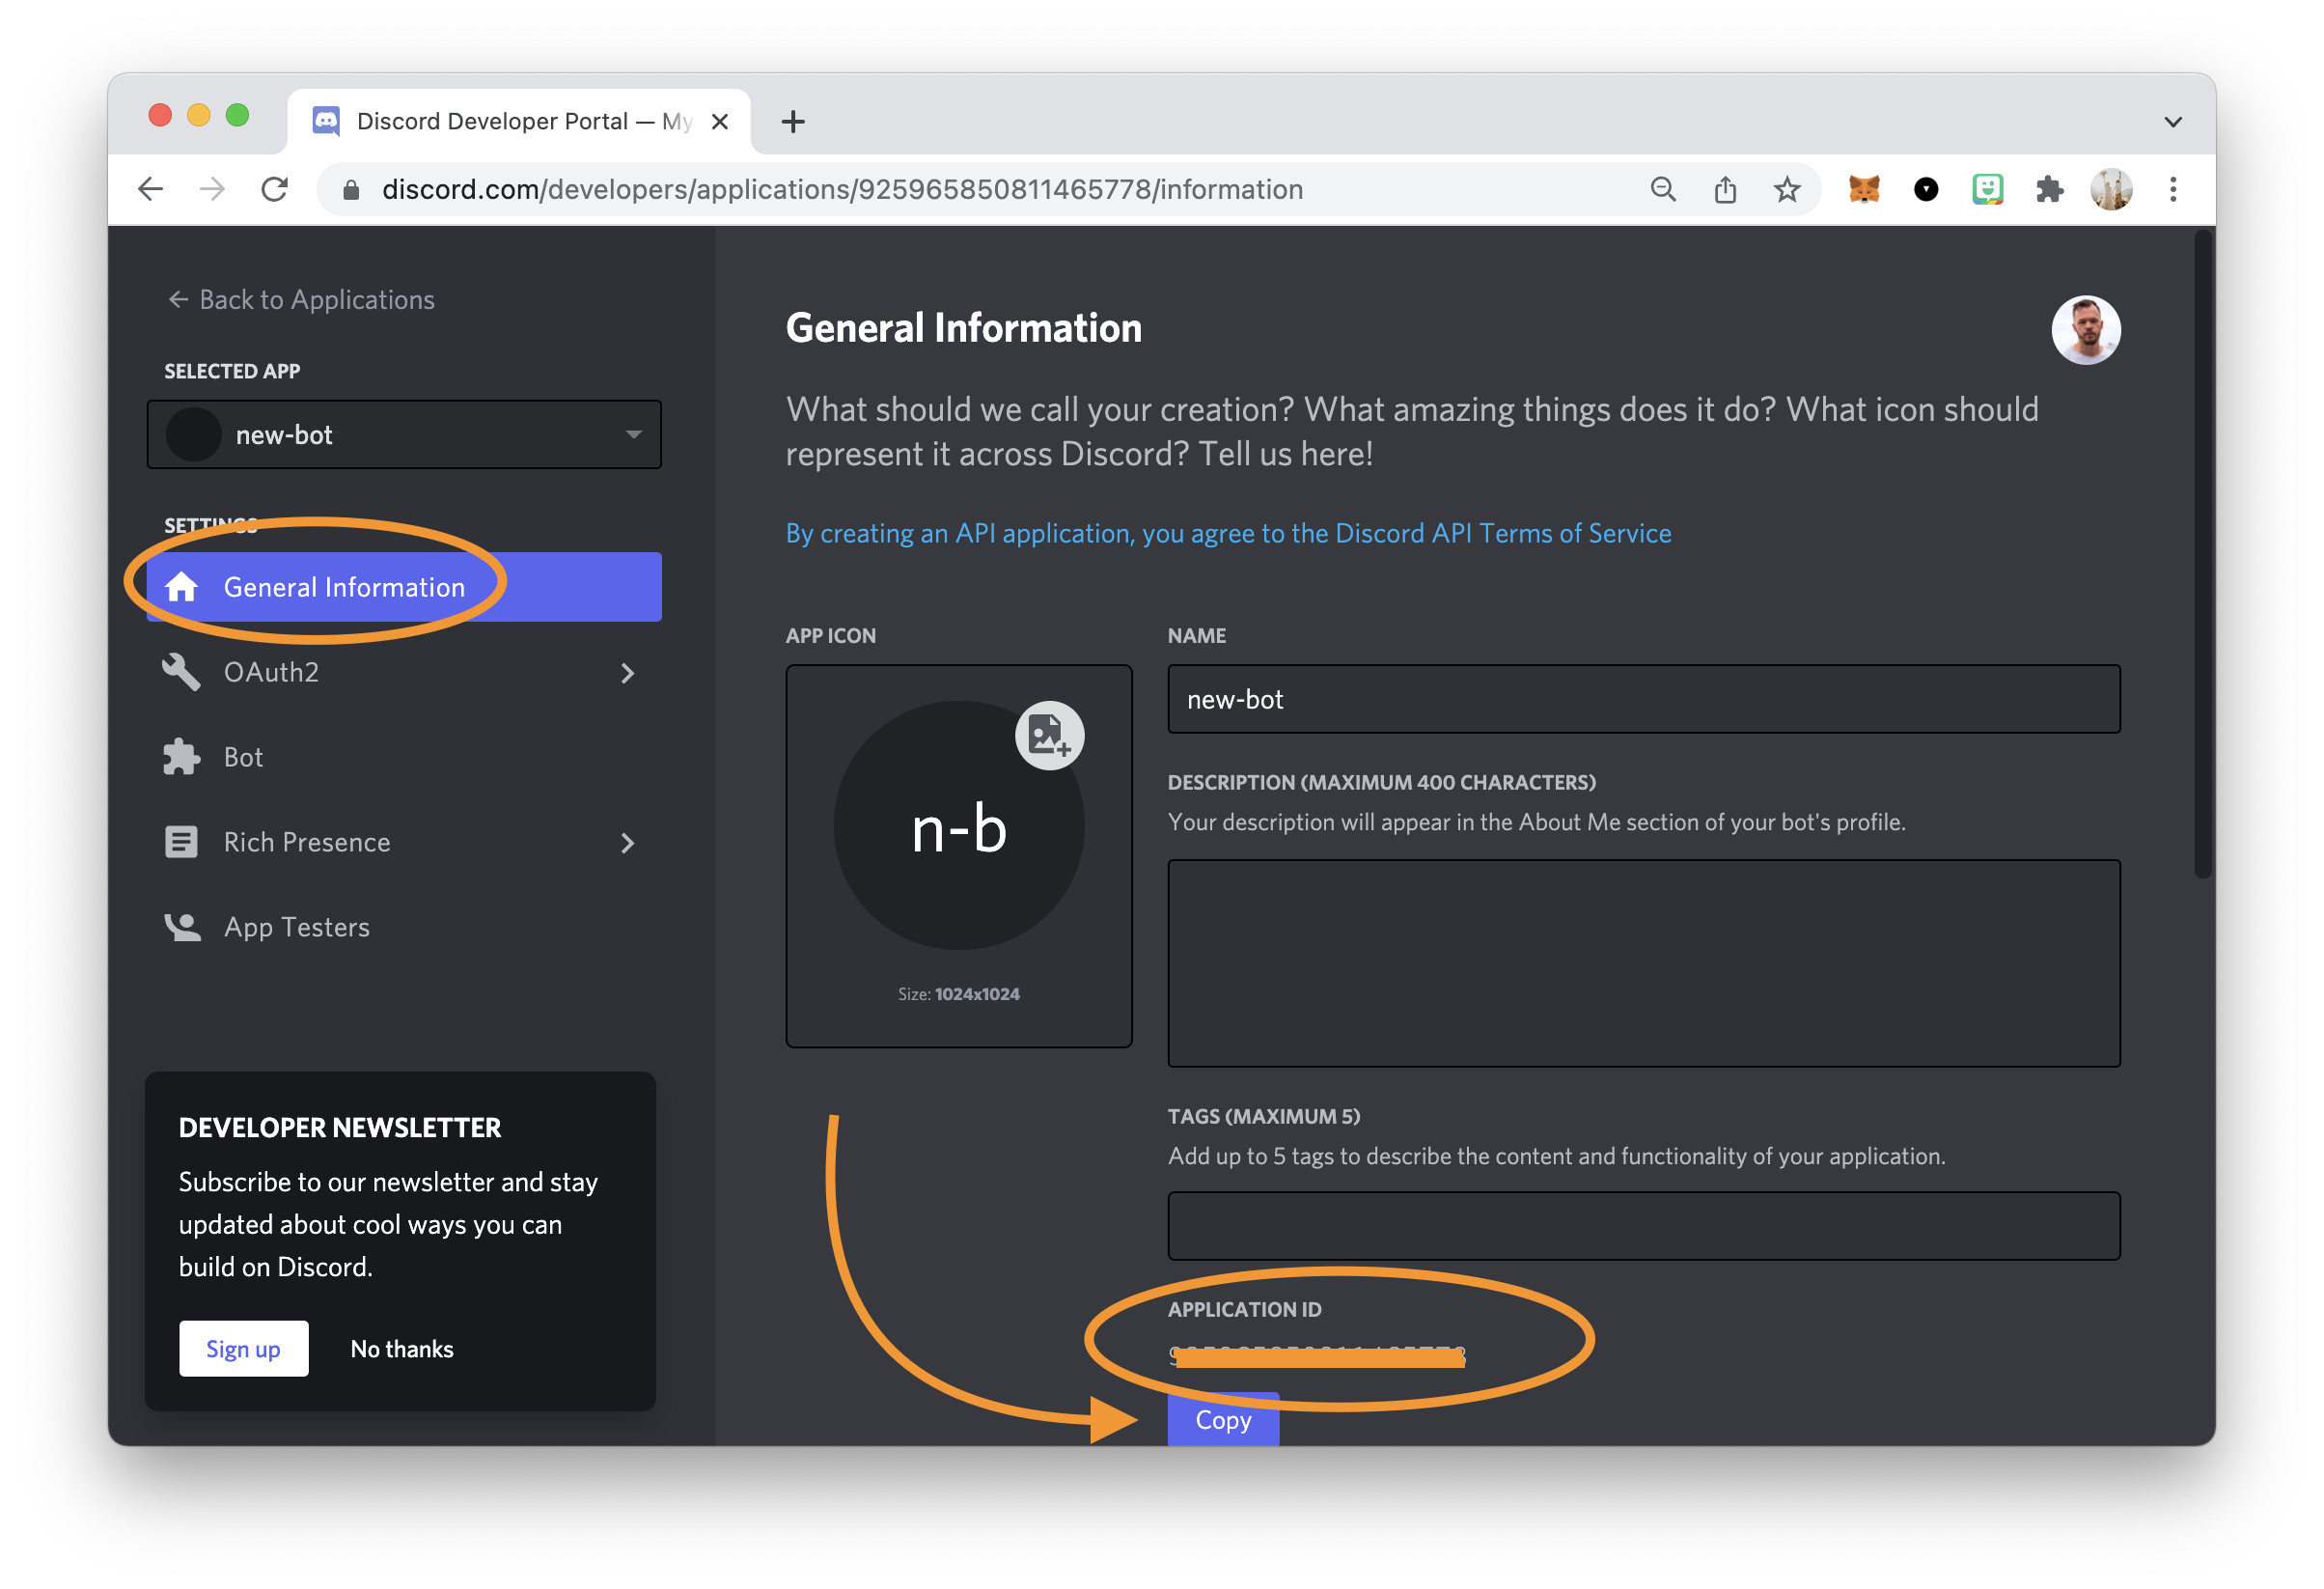
While we are still in the developer portal, let's note down the application ID, as we also need to use this.
Adding the bot to your server
Now that our bot is set up, we can add this bot to our server. To do this, we can follow the following URL format.
https://discord.com/oauth2/authorize?client_id={APPLICATION_ID}&scope=applications.commandsMake sure to modify the APPLICATION_ID with the retrieved application id.
Please open this link and follow the steps to add it to your desired server.

That's it. This bot can now access our server and act on the slash commands.
Register slash commands
This step wasn't clear to me initially, but slash commands need to be registered on a specific application!
Discords preferred way is to use guild commands, but we'll use a global one. (Downside: It can take an hour to refresh if you change commands)
You can either perform a CURL request or create a script that does this for us to register commands.
We will be using the discord.js package to leverage the registration part from there.
Let's quickly set up a new project and install all the packages.
# Create folder
mkdir discord-slash-bot && cd discord-slash-bot

# Initialise node
npm init

# Add packages
npm i discord.js @discordjs/rest discord-api-types dotenv
Now let's create a .env file to keep our two secret elements in a save spot.
APP_ID={APPLICATION_ID}
TOKEN={YOUR_BOT_TOKEN}
And then let's make a new file called register.js. This file will handle the command registration with discord.
const { REST } = require('@discordjs/rest');
const { Routes } = require('discord-api-types/v9');
const commands = [
  {
    name: 'randomice',
    description: 'Return a random mouse',
  },
];

const rest = new REST({ version: '9' }).setToken(process.env.TOKEN);

(async () => {
  try {
    console.log('Started refreshing application (/) commands.');

    await rest.put(Routes.applicationCommands(process.env.APP_ID), {
      body: commands,
    });

    console.log('Successfully reloaded application (/) commands.');
  } catch (error) {
    console.error(error);
  }
})();
As you can see, we define our command with a name and description.
Then we perform a PUT request to Routes.applicationCommands and pass our APP_ID.
This will register the commands we defined for this app.
Let's add a new script to run this command quickly with our environment variables.
Add the following in your package.json file.
"scripts": {
  "register": "node -r dotenv/config register.js",
},
Then you can execute npm run register, which should show an output like this.

Note: You can verify the registered commands by performing a GET request to this endpoint.
I quickly tested this in Insomnia. You can use a URL like so:
https://discord.com/api/v9/applications/{APP_ID}/commandsYou can set an Authorization header like so:
Authorization: Bot {TOKEN}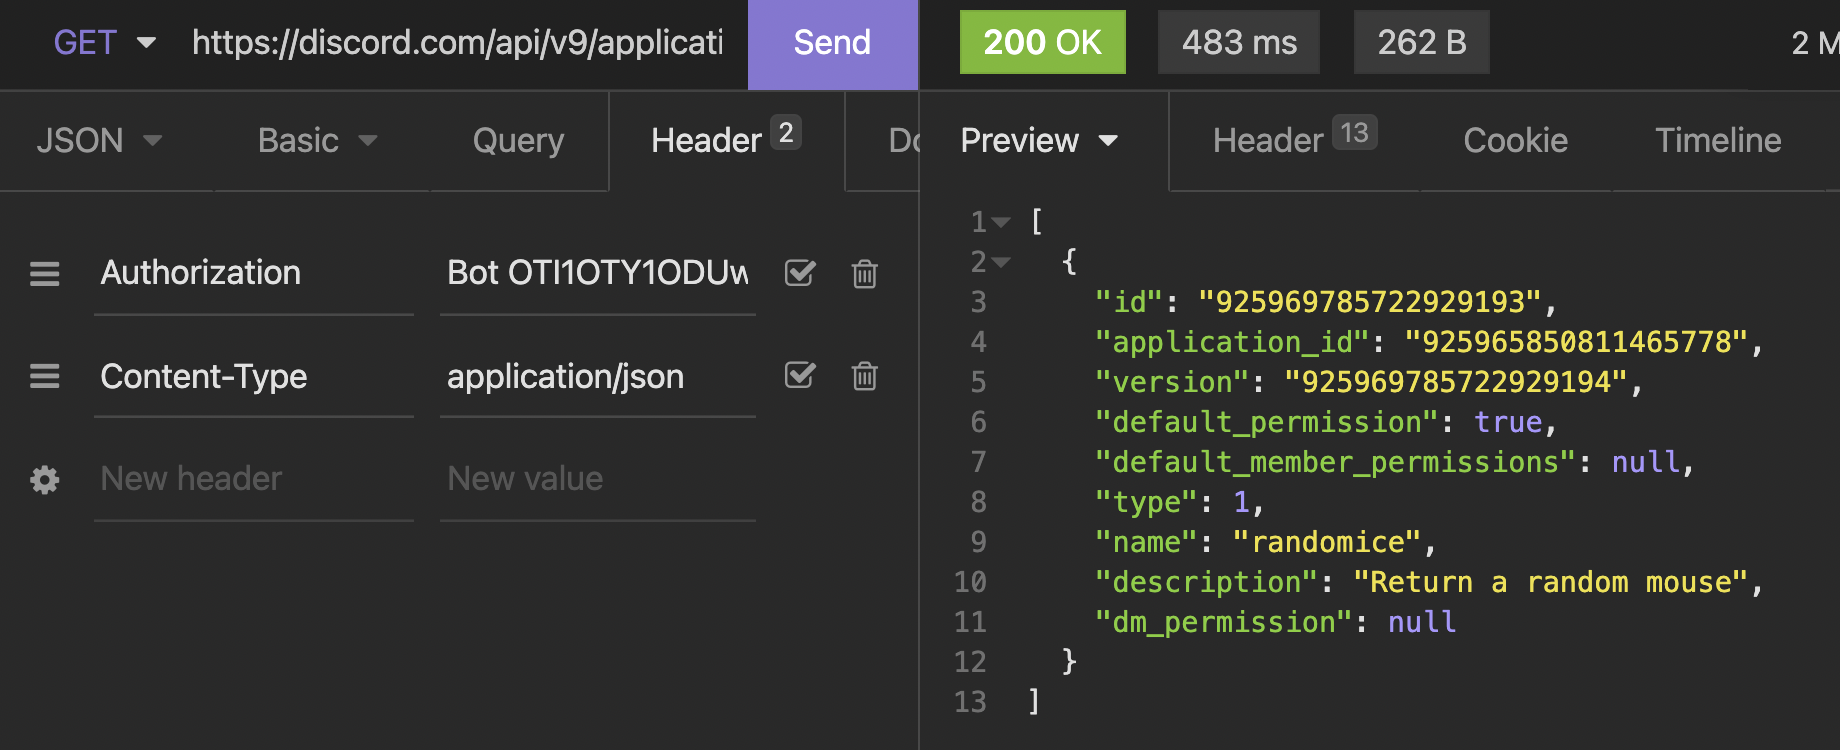
The actual slash command handler
Alright, so far, we have our bot setup and added to our discord server, and we registered our command with discord. But the commands don't exist yet.
For this, we'll be creating an index.js file.
Let's start by loading the discord client.
const { Client, Intents } = require('discord.js');
const client = new Client({ intents: [Intents.FLAGS.GUILDS] });
Note: The intents flag is needed here to register a client.
Then we can listen and see when we are connected.
client.on('ready', () => {
  console.log(`Logged in as ${client.user.tag}!`);
});
Then I went ahead and created an array of random mouse things.
const options = [
  '🐭',
  'https://media.giphy.com/media/wJZTbXayokOgbCfyQe/giphy.gif',
  'https://media.giphy.com/media/QXh9XnIJetPi0/giphy.gif',
  '🐁',
];
The next step is to listen to all interactions and fire an event when our action is met.
client.on('interactionCreate', async (interaction) => {
  if (!interaction.isCommand()) return;

  if (interaction.commandName === 'randomice') {
    await interaction.reply(
      options[Math.floor(Math.random() * options.length)]
    );
  }
});
If we hit the randomice command, you can see that we reply with one of our options in random order.
The last step is to call the login command with our bot token.
client.login(process.env.TOKEN);And then let's also add a script in our package.json for this file.
"scripts": {
  "register": "node -r dotenv/config register.js",
  "start": "node -r dotenv/config index.js"
},
We can now run npm run start and spool up our bot.
And once it's ready, we can start typing our command, and it should appear as an action.

And that's it! We created our very own slash command discord bot.
You can find the completed project on GitHub.
Thank you for reading, and let's connect!
Thank you for reading my blog. Feel free to subscribe to my email newsletter and connect on Facebook or Twitter