The previous article introduced a table of contents in our markdown files. For this, we leverage the rehype autolink headings plugin.
The cool part about this plugin is that we can modify the output to better match our website's style.
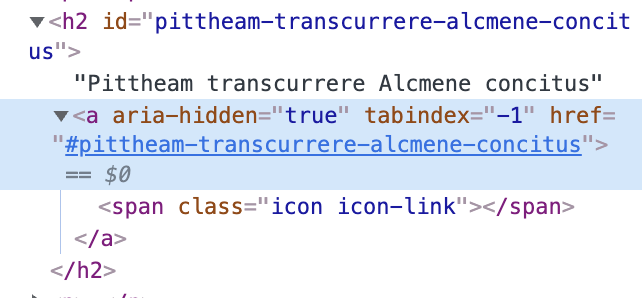
Let's first see what the plugin does by default, and by inspecting our headings, we can see the following markup added.

As you can see, the plugin added a href element inside a span element.
This is great to make the TOC plugin work; however, we can modify this output to make more sense for our design.
Modify the Rehype Autolink Headings plugin
To modify the plugin, we have to pass arguments to it.
We can change the behavior of the plugin, which by default uses prepend to be any of the following:
prepend: before the textappend: after the textwrap: wrap the whole headingbefore: before the headingafter: after the heading
And we can set these in the following way:
[
  "rehype-autolink-headings",
  { behavior: "append"},
],
Next, we can also set the properties, which are by default: {ariaHidden: true, tabIndex: -1}
You can for instance add a class here:
{ariaHidden: true, tabIndex: -1, class: 'my-class'}The next one is the content, which is the interesting one.
We have to pass hast elements thought.
If you want to read more about hast elements, check out this documentation link.
Let's see if we want to add a simple p element.
[
  "rehype-autolink-headings",
  { behavior: "append", content: [h("p.class-name", "This is a link")]},
],
This will add a paragraph element with the class class-name and the content This is a link.
In my case, I want to add a span and an SVG with a link icon rendered in it.
import { h, s } from 'hastscript';

export default /** @type {import('astro').AstroUserConfig} */ ({
  markdownOptions: {
    render: [
      astroRemark,
      {
        rehypePlugins: [
          [
            'rehype-autolink-headings',
            {
              behavior: 'append',
              properties: {
                class: 'autolink-header',
                ariaHidden: true,
                tabIndex: -1,
              },
              content: [
                h('span.visually-hidden', ' permalink'),
                s(
                  'svg.autolink-svg',
                  {
                    xmlns: 'http://www.w3.org/2000/svg',
                    width: 24,
                    height: 24,
                    fill: 'currentColor',
                    viewBox: '0 0 24 24',
                  },
                  s('path', {
                    d: 'M9.199 13.599a5.99 5.99 0 0 0 3.949 2.345 5.987 5.987 0 0 0 5.105-1.702l2.995-2.994a5.992 5.992 0 0 0 1.695-4.285 5.976 5.976 0 0 0-1.831-4.211 5.99 5.99 0 0 0-6.431-1.242 6.003 6.003 0 0 0-1.905 1.24l-1.731 1.721a.999.999 0 1 0 1.41 1.418l1.709-1.699a3.985 3.985 0 0 1 2.761-1.123 3.975 3.975 0 0 1 2.799 1.122 3.997 3.997 0 0 1 .111 5.644l-3.005 3.006a3.982 3.982 0 0 1-3.395 1.126 3.987 3.987 0 0 1-2.632-1.563A1 1 0 0 0 9.201 13.6zm5.602-3.198a5.99 5.99 0 0 0-3.949-2.345 5.987 5.987 0 0 0-5.105 1.702l-2.995 2.994a5.992 5.992 0 0 0-1.695 4.285 5.976 5.976 0 0 0 1.831 4.211 5.99 5.99 0 0 0 6.431 1.242 6.003 6.003 0 0 0 1.905-1.24l1.723-1.723a.999.999 0 1 0-1.414-1.414L9.836 19.81a3.985 3.985 0 0 1-2.761 1.123 3.975 3.975 0 0 1-2.799-1.122 3.997 3.997 0 0 1-.111-5.644l3.005-3.006a3.982 3.982 0 0 1 3.395-1.126 3.987 3.987 0 0 1 2.632 1.563 1 1 0 0 0 1.602-1.198z',
                  })
                ),
              ],
            },
          ],
        ],
      },
    ],
  },
});
And by doing that, we can create this unique SVG link icon, which clarifies our headings are also links.

You can use the visually-hidden class to hide the text for the user but have the screenreader read it out.
.visually-hidden {
  border: 0;
  clip: rect(0 0 0 0);
  height: auto;
  margin: 0;
  overflow: hidden;
  padding: 0;
  position: absolute;
  width: 1px;
  white-space: nowrap;
}
And that's how we can modify the rehype autolink headings plugin to be our bit more.
You can find the complete code on GitHub.
Thank you for reading, and let's connect!
Thank you for reading my blog. Feel free to subscribe to my email newsletter and connect on Facebook or Twitter